

Summary:
Many users look for a solution to convert their OST files into PST, but faces issue while making a conclusion. This blog is all about the discussion related to convert OST to PST while making sure to keep the data safer while processing the conversion.
10 numara 5 yıldız ataşehir sarışın escort bayanlar sizi bekliyor.
OST file is a cache file of an Exchange Server which replicates their data and allows users to access them even in the Offline mode. However, there are various occasions where you need to convert OST to PST and incapability to share an OST file is one of them. Even when the Exchange server goes down, access to the OST file becomes difficult. Also, to switch to the newer email client from the existing one, the need to convert OST to PST becomes important.
Yabancı uyruklu güzel hatunlar büyükçekmece escort sayfasında sabırsızlıkla aramınızı bekliyor.
However, this write-up will explain to you the solution to convert an OST file into a PST file which will be supported in all Outlook versions. Also, we will give a glimpse into some of the most reliable options available to make the conversion which will include manual methods and one third-party converter tool.
What are the methods available to make OST to PST conversion?
Outlook provides the user with an option to change the OST file format into a PST file, including the drag & drop method, Archiving method, and Import/Export. However, here we will focus on two manual solutions to convert OST to PST, which you can check them.
Use of Archiving Method to Move OST files to PST
Whenever users do not require the older emails, they simply move them into the archive folder, which will also help keep the mailbox size to a minimum. Once you apply Auto-Archiving, you can easily convert OST to PST files. To check how to perform this conversion by activating the Archiving in Outlook, follow the listed procedure carefully:
- Initially, launch Outlook and from the menu section, choose file. Now explore the Outlook options.
- Select Advanced from Outlook options and follow by clicking on AutoArchive Settings options.
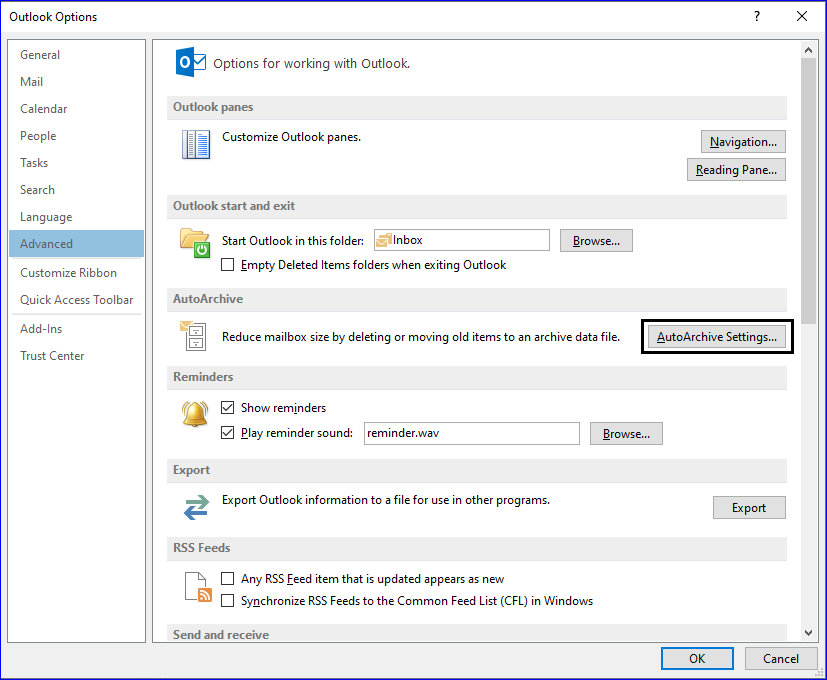
- An AutoArchive wizard will pop up where you can customize the process accordingly. You can make changes in the duration to run the auto archive. It is easier to set the location to move the older emails using browse. Now click on the Ok button to continue with the process.

Once you are successfully able to complete the above mention procedure, then your OST emails will move into the PST file.
Using Outlook Import/Export Method
This is another solution which many Outlook users opt to convert OST to PST file. But one thing the user should remember while making the conversion is to create a backup of the data in order to recover from the most vulnerable outcomes. We have mentioned the step-by-step methods to make it easier to complete the conversion.
- Open Outlook, make click on the File and then choose Open & Export. Also, later on, click on Import/Export.

- Now the Import & Export wizard will pop up on the screen. Here user needs to select the Export to as file option from the choose an action to perform. Then click on the next button.

- In the Export to a file wizard, move with opting the Outlook data file option and later on press the next button.

- Select only the required folder and also chooses the subfolders using the Include Sub-Folder option. Do click on Next to go ahead.

- Now, you will be asked to save the output file at the specific location using the browse button. After that, click on the finish button.

These methods, which we have forayed into, come with many restrictions, which are explained below:
- Incapability to export multiple OST files simultaneously indirectly increases the conversion time.
- The conversion may end up with moving incomplete items from the OST files.
- Quite a bit difficult process for those who don’t have adequate technical knowledge.
- Adding large-sized OST files can make the process stagnant at some point.
So, to deal with such limitations using third-party software to convert OST to PST will be the ideal choice. Now, we will move to the last section of this blog, describing best utilities to make the conversion effortless.
Use a Third-Party Application to Convert the OST File to PST
Well, we have discussed a lot about the methodologies to carry out the conversion of the OST files, but all of them create issues at some point in time. To avoid making a mistake while moving the OST, you should consider the third-party utility.
Shoviv OST to PST converter is among the top-notch product to complete the conversion without sacrificing the data integrity of any OST file item. The software comes along with an intuitive graphical user interface, which makes it comfortable for users to navigate to the software features easier. However, to learn about the more advanced features of this utility, kindly check out below:
- There is no restriction to add multiple OST files, and also users at the same time can start the procedure to convert them into PST files.
- After loading the required files into the tool, users can check them all with their items under the software preview pane.
- Its data filter option becomes essential if any user wants to customize the process. Using it users can be able to convert OST file with the required data.
- Users can set the file size of a resultant PST by using the software PST split option.
- In addition, an incremental export option is also available. It allows the software to process only the remaining item left from the last time conversion, and it will keep a check on the duplicate items.
- Also, users can benefit from its other features to repair the corrupted OST file item.
Now we will cover up the detailed procedure of executing the conversion process. Kindly follow the steps mentioned below:
- Kindly open the Shoviv OST to PST converter and straightaway click on Add a file from the tool’s ribbon bar.
- Once you click on it, a new window will open where you will get multiple options to add OST. After adding them, hit on the Ok button.
- Now the software loads the entire added file item, and the user can also take the overview. Select OST to PST.
- Users can add/remove any sub-folder from the OST file using the Include/Exclude subfolder option. Otherwise, click on Next.
- Now the filter option comes up where users can use them to selectively process their data. Later on, click next to proceed ahead.
- In the Export item in the PST wizard, users can opt for the option to club the resultant file into the existing PST and also can create a new PST. User can also make their PST file protected with some password. After that user should click on the next to start the conversion process.
- The software will begin converting OST files into the PST and also shows the live processing logs.
The Bottom Line!
Converting the OST file with the complete data through the manual solution comes with many hurdles. We have made you aware of some of them and also explained to you the solution to overcome them. The third-party software which we have discussed here to convert OST to PST has many advantages, and completing the conversion quickly is some of them. However, to test the software’s efficiency, users can try using its free trial version.