How to draw a robin. The robin may seem like a pretty unassuming little bird, but it has remained a popular species worldwide! It is also one of the familiar birds in the United States and is even more popular as the state bird of several US states. It even serves as the theme for a popular superhero sidekick!
It is also an inconspicuous but pretty little bird, which makes it common for people who want to learn how to draw a robin. When you know what to do, it can be a fun challenge! If you are looking for 3d drawing, drawing for kids, cartoons drawing, animals drawing and many more, then you are at the right place.
Drawing a Robin
Step 1:
For this first step in drawing a robin, we’ll start with the outline and face of the bird. It would be easier to start with the outline of the body. The left flank will be marked with a long, curved line, which choice leads to the outline of the head. We’ll count some points to the face and head in a point, but rather, we’ll count the proper flank of the body. It will be drawn with bumpier lines than the ones we used for the left side.
Next, you’ll use a string of lengthier curved lines for the branch the robin sits on. Then, once you’ve drawn those outlines, you can count some points to the head and face. These will have rounded forms for the eyes, and then you can add sharper details for the beak.
Step 2:
We will add subtle feather details in this second part of your robin drawing. We’ll use rough line detail rising from the eye and down the lead for the head. Then you can use curved lines to make the borders of the wing feathers. That’s all there is to this step, and you’re good to go!
Step 3:
Continuing from the previous steps, we’ll add some detail to the robin’s chest in this next step. First, extend another bumpy line from the bird’s shoulder down, then across the bottom of the bird’s chest. Then you will draw sharp, jagged lines to form a square shape under the details you just drew.
Step 4:
In the following parts of your robin drawing will notice you are drawing the thin short legs of the robin and the branch it is sitting on. The legs will be extremely thin and linear, and each will end in three little toes wrapped around the branch. Speaking of this branch, we will also start drawing it in this part. You can add more curved lines to complete the branch using the lines you have already started. Then there will be just a few final details to add in the next step!
Step 5:
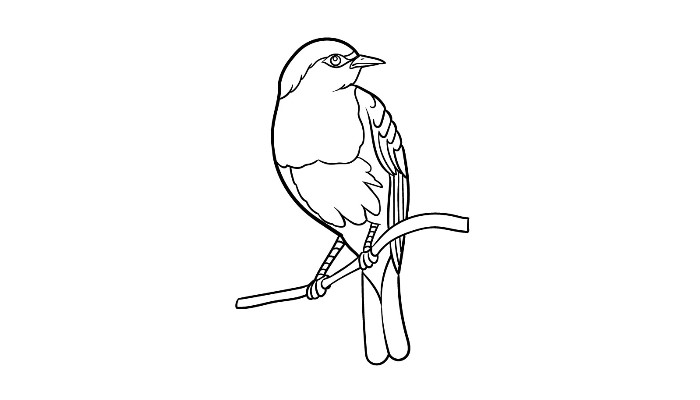
As we mentioned in the previous step, we have a few more details to add to this part of our guide on drawing a robin. The main aspect of this part will be adding the tail feathers. These will be drawn with two curved lines with a parting line in the center of the tail. Then you can finish the final details before continuing. First, you can draw small lines on the legs to give them some textural detail.
Then you can use curved lines on the wings to give them even more feather detail. That will suffice for the details in this guide, but before you continue, you can also add your details and elements! It might be fun to draw a background for this picture to show the environment this robin is sitting in. What additional details and elements can you consider to complete this drawing before the final step?
Step 6:
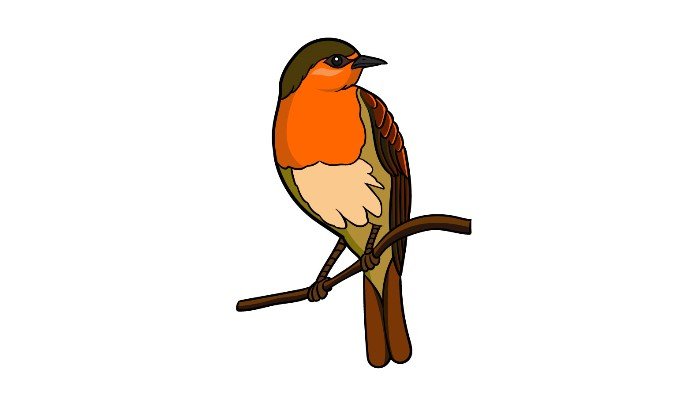
Now that you’ve finished your robin drawing, you’re ready to add some amazing colors to it in this final step! In our reference image, we showed you the typical colors of a robin, so you can follow them if you want to keep them more realistic. Even if you keep the colors more realistic, there are plenty of ways to give color feedback! If you have drawn a background with additional elements, you can use it to add your favorite colors to this image. Even if you haven’t drawn a background, you can work in fun colors this way.
Make your robin drawing easier!
Creating your robin picture is easier as we offer 3 tips to assist you. This robin illustration charges so many subtle elements to get this pretty bird to life in your painting. As you get used to this design, these details can make it easy to miss. There would be zero wrong with facilitating the picture to create it easier. It will depend on which aspects of this drawing you find the most difficult. For example, details or proportions of feathers may be difficult for you. If so, simplify them or remove those details to make them easier to represent.
You can still add some of these deleted details when you make more attempts! Another way to make this robin drawing a little easier would be to draw it in a completely different art style. Again, this change would be up to you and your preferences.
Robin Drawing
For example, you might like to draw in a cartoon style. If so, you can adapt the design of this robin to fit the style you prefer. You could do this not only if this drawing is too difficult but also if you want to create variations of this famous bird.
Finally, you might as well use a few more references to help you while you work on this robin sketch. Glancing at a real robin would be ideal for this, but they are not to sit still lengthy sufficiently to pose! Instead, you can search for photos of real robins online to help you navigate this guide. Using these photos and our reference images, you can break them down into basic shapes. Draw these shapes in with your pencil, and then you can add a few more layers of finer detail to help add the realistic touches we’ve included in our example. Using these additional images and methods should make this drawing much easier!
Your drawing of Robin is complete!
We expect you contained a lot of joy going through this guide on how to draw a robin! Even though this drawing had some small intricate details, we designed it to make it easy and fun for you. If you follow these steps and take it slow, we know you’ll create an amazing robin drawing! Once you’ve mastered this guide, you can go even further with your faucets! We’ve mentioned a few ideas, like drawing a background, but you can also spice it up using your favorite colors and artistic mediums.
These live only a few ideas, so what else can you feel for this photo? This guide is just one of many we have on our website for you to enjoy! When you’re ready for more, we’ve got plenty more guides for you, and we’re uploading new ones frequently. We’d also love to see your awesome robin drawing when it’s finished, so share it on our Facebook and Pinterest pages once it’s done!
Also Read: How to draw acorns