
One of the biggest mistakes you can make when installing a tile floor is not adequately preparing the surface before you start. This can lead to issues such as uneven and bumpy surfaces. Dirt and grease also create a slick surface that interferes with a strong bond. These mistakes will only increase the difficulty of the installation process.
Preparing the surface before installing tile
Preparing the surface before installing the tile floor requires a level and flat substrate. If there is unevenness in the substrate, you must create a slope to the perimeter edge and drain. Poorly prepared surfaces will cause problems during the installation. Fortunately, there are a few easy steps you can take to ensure your new floor looks great.

To ensure a durable tile floor, you must prepare the subfloor. Gritty or uneven subfloors will cause the tile to crack and come loose. Dedicating time to subfloor preparation will help the tile lay flat during installation. In addition, planning the layout of the tile is essential in preventing rookie mistakes.
In addition to preparing the surface for the tile floor, you need to prepare the wall for the installation. It must be level, clean, and strong enough to support furniture and other items. You may have to install a cement backer board to provide a firm base for the new tiles. If you have an old tile floor, it is necessary to remove it before installing new tiles. However, if the floor is made of concrete, you can skip the cement backer board and just attach the tiles directly to the concrete.

A concrete floor patch will repair damaged areas and give you the height you need to install the tile. It is important to cure the patch thoroughly before installing the tile. After the patch is dry, you can now install the tile. Be sure to round off the edges of the tile with a stone. Afterward, you can apply a sealant to the edges of the tile.
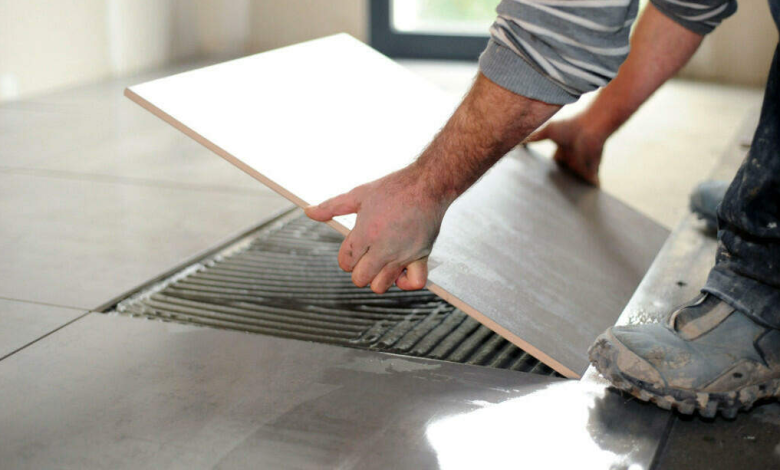
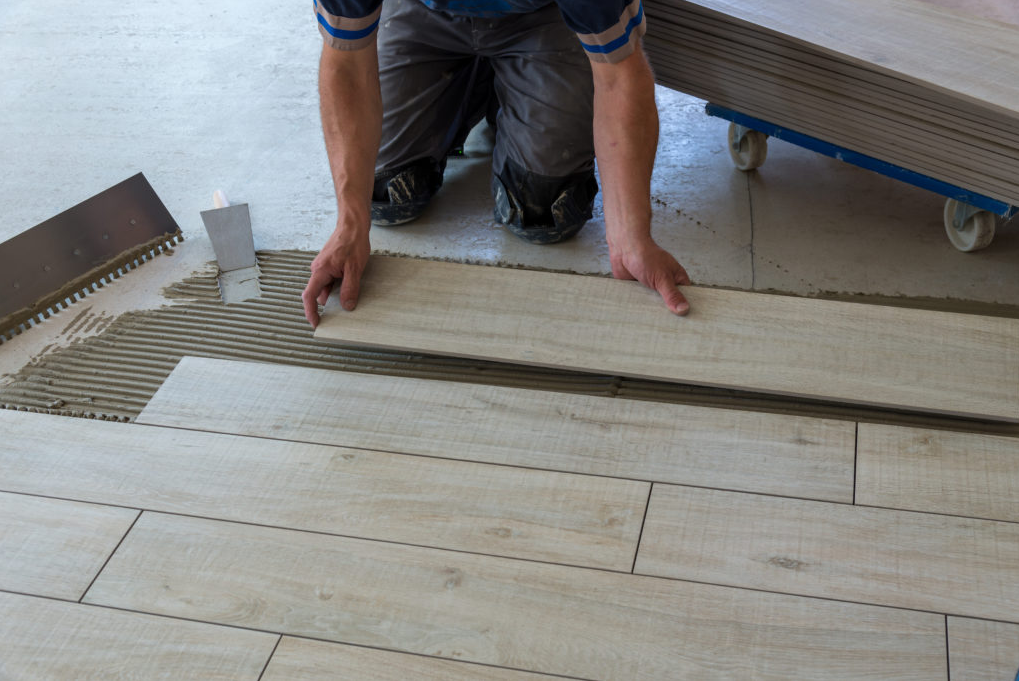
When you’re ready to install the tile, use a trowel with a 1/4-inch notched edge. You can also use a rubber mallet to press the tiles into the mortar. This method will help ensure even spacing throughout the floor. If the tiles are too large, you can use a tile spacer to even out the spacing between them.
Using the wrong tools
When you’re installing a tile floor, you may want to use the proper tools to avoid problems. The wrong tools can lead to cracks and loosened tiles. If you’re unsure of what tool to use, you can always consult a guide. When cutting tiles, a diamond-wet saw is best. It’s the most abrasive tool available, but some tiles can be cut with a manual cutter.
You’ll also want to make sure that you prepare the surface properly. This will ensure a stronger bond between the tiles and the adhesive. Before installing the tile, you’ll need to lay an underlayment. This needs to be level, smooth, and strong. Otherwise, tiles will sag and crack when they’re laid.

Another tool that you’ll need to use is a tile angle checker. This tool will ensure that you’re installing your tiles at the correct angle. Make sure you use it carefully because it can cut you. You’ll also need a tile cutter or wet saw to make straight cuts.
The tools you need to install a tile floor depend on the size and type of tile you’re installing. If you’re installing a small mosaic tile, you can use a tile nipper. For larger, hard tiles, you can use a wet tile saw. You’ll also need a nipper to pick up small pieces of tile. Other tools you’ll need include a notched trowel for the adhesive and a grout float to spread the mortar.
Using unsuitable sub-floor or drywall materials
When installing a tile floor, it is important to choose a sturdy subfloor made from a material that won’t shift under the weight of the tile. You should avoid particle board or linoleum flooring, which may contain asbestos. Also, make sure that the subfloor is level. This will prevent the tiles from warping or cracking.
A suitable sub-floor material for ceramic tile is usually plywood or OSB, which are 5/8″ thick. Using a 1/2″ concrete bearing can result in a sub-floor that is 11/8″ thick. When using plywood as a sub-floor material, you must make sure to leave a 1/8- inch-wide gap between each sheet, and the edges should not be more than a third of an inch off-plane. If your sub-floor is too thick for your tile floor, you should consider installing a new sub-floor layer made from 5/8-thick exterior plywood with a cement backing.

Before you begin installing tile, you should prep the subfloor by making it level. This will help the tile adhere to it better, and it will also help keep the floor rigid. When preparing the subfloor, you should also prepare the subfloor with underlayment, which is a material that sits on top of the subfloor. In addition to making sure that the sub-floor is level, you should check for dips in the floor. If you find any, mark them so that you can work on them later. Also, make sure to fill any seams with caulk or other materials. In addition, you should tape off any vents in the subfloor.
After you have installed the subfloor, you can install the drywall. While it can be messy, this step is important. When installing floor tiles, it is important to leave a gap of at least 1/2 inch between the sub-floor and the drywall, as drywall expands and contracts and can cause the flooring to warp. Furthermore, it is important to keep the drywall dry, as excess moisture can cause the drywall to rot and harbor mold.

Using long plank-style tiles
If you have a large floor area, consider installing wood plank-style tiles. Typically, you can find tiles in lengths of 40 inches or more. For a smaller area, a shorter tile length can be used. For example, if you are redecorating a bathroom, a 40-inch tile length may be more suitable.
Wood-look plank tiles will give your floor a traditional feel. You can find them in porcelain stoneware or in wood-look porcelain. Wide plank-style tiles offer an open look with fewer seams, which makes them more visually appealing. They will also ground your room and highlight white furniture. You can also use these tiles in large, open areas of your home to add elegance and make the space feel larger.
Large plank tiles come in many styles and colors. You can also use larger planks for accent walls in your bathroom. They make the walls of showers easier to maintain and look more stylish. Additionally, these tiles make a great accent wall, especially in smaller bathrooms. Long plank-style tiles are a trend this year and will continue in 2019. Many manufacturers are preparing to produce longer, wider plank-style tiles to meet the growing demand of consumers.
Before laying your long plank-style tiles, prepare the floor. You will need to level the floor before laying the tile. A flat floor will make it easier for you to lay the tile. You also need to choose the right thin set to make the floor level. Laticrete 4xit is a great option for this type of floor. Another option is to use a marble and granite mix.

You can find wood-look tiles at any price range. Prices range from a few dollars per square foot to more than $20 per square foot, depending on the quality and manufacturer. However, be wary of cheap plank tiles. They are prone to damage and may not last long.
Using improper underlayment
If you want to install a tile floor in a kitchen or bathroom, you must prepare the subfloor properly. If you do not prepare the substrate properly, the tile could get stuck, causing it to crack. To avoid this, you can use an underlayment that is designed for this purpose.
Before you begin the process of installing tile, you should remove the old floor and install a good underlayment. It is also important to check for damaged or cracked tiles that indicate moisture or subfloor problems. You should also listen for a hollow sound when tapping the tiles. This indicates that they may have been damaged by moisture and did not adhere well to the subfloor.

Another reason for improper subfloor preparation is unevenness. If the subfloor is uneven or has debris covering it when the tile is laid, it will cause cracks. Concrete absorbs water and expands and contracts with temperature changes. While tile is not as elastic, the lack of giving in its surface will result in cracking during the concrete’s settlement process.
Before installing tile on concrete, you must ensure that the subfloor is level. Otherwise, you may encounter cracks or popped-up tiles. In addition, the uneven subfloor will cause the tiles to the tent and cause pressure to build up. In addition, the tiles may also crack or buckle and this is not desirable.

When installing a tile floor, it is essential to follow industry standards and best practices. The subfloor is a vital component of the tile installation process, and the right underlayment will solve numerous problems. By using proper underlayment, you will be able to save both time and money.